PN 30IN
The afterburner is for motor PN SPMXAM3000 (3060-1900Kv)
Options
Select-A-Fire TrueFire - Random flickering from 30% to 50% throttle to simulate the afterburner lighting/turning on. From 50% throttle to 100% throttle the afterburner gets brighter with full brightness at 100% throttle. Select-A-Fire adds the ability to adjust the throttle position where the main Orange LED turns on. The ability to turn on and off the flickering effect is also provided.
Select-A-Fire BlueFire - Random blue led ring flickering from 30% throttle to 50% throttle. Center afterburner led is not on during this portion. From 50% throttle to 100% throttle the center afterburner led gets brighter with full brightness at 100% throttle. The blue led ring is on at a lower intensity during this portion. Select-A-Fire adds the ability to adjust the throttle position where the Blue LED starts to flicker. The ability to turn on and off the flickering effect is also provided.
No additional radio (TX) programming is required to achieve the realistic afterburner effect. This is a plug and play system.
Includes a 3D printed motor mount, 20" extension wiring from controller to LED, connection to a 6S battery balance port and receiver. We can offer a 4S version if desired. Just let us know.
An integrated Y cable is provided with the controller to split the throttle signal from the receiver (RX) and provide it to the afterburner controller and the ESC.
The controller itself weighs 18g.
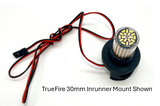
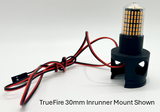
The dimension listed is for the outside diameter of the motor. The unit can be attached to the motor using a zip tie, Gorilla tape or FoamTac glue. See photos for more information.
Installation instructions:
1) Remove the motor per the manual instructions.
2) Attach the afterburner LED unit to the rear of the motor using FoamTac Glue. Tighten zip tie and add Gorilla tape if desired. Leave the FoamTac to set for 24 hours and then you can remove the zip tie if desired.
3) Route the LED wire to the battery compartment.
4) Connect the LED wire to the TrueFire LED controller.
5) Connect the ESC lead to the Y splitter. One end goes to the receiver throttle port and one to the TrueFire LED controller Throttle connection.
6) Connect the TrueFire LED controller Battery connector to the balance lead of the battery.
7) Power on the plane and the transmitter. Make sure your plane is secure prior to adding throttle input. Give it throttle and enjoy the TrueFire! It gets really good around 30% throttle input.


